The Facebook Conversion Pixel, aka Facebook Pixel, is a piece of code that helps you track and optimise your Facebook ads for actions that are valuable to your business. Although setting up a Facebook Pixel and tracking the events you need can be simple via third-party tools or with the help of a developer, ensuring that it is set up correctly is a critical yet tedious task you need to perform to ensure your campaigns’ success.
Depending on the type of business you run, you need to implement a set of events that will allow you to track, measure, and optimise it for events that are important to your business. Once you implement the Facebook Pixel on your website, it fires (sends a signal) every time a user performs any action that corresponds to the pre-implemented events. Based on these events and their associated parameters, you can:
- target new prospects that are more likely to perform them (prospecting campaigns)
- target people who have already performed specific actions (remarketing campaigns)
- refine your target audience by excluding people who have performed them
The above options help you optimise for success, but how can you ensure that the Facebook Pixel and Facebook events are set up correctly?
Facebook Pixel Helper Chrome Extension
The Facebook Pixel Helper is a Google Chrome Extension that helps you to see all of the pixel events that have been fired on a given page. You can install it from the Google Web Store. After adding the extension to your browser, you will see the </> icon next to your address bar.
Facebook Pixel Helper will display information about the event name detected and the parameters being sent. The green checkmark indicates that the PageView event has been properly implemented. A yellow warning symbol or a red error symbol means that there’s a problem that you need to address.
When this happens, you need to click on the arrow next to the pixel event where information about the warning or error will be displayed. You can use this information to make the necessary changes and retest.
Facebook Retargeting Pixel Debug Tool
As you might have figured out, this is a great tool for debugging Facebook Pixel events related to retargeting. Enter the Pixel ID in the provided field and click on the “Submit” button.
Keep in mind that you need to provide a Pixel ID to which you have access. Once you do, you will get information on the following:
- The Catalogue IDs your pixel is associated with. This means it will display all the IDs of the catalogues your Pixel has been connected to as an Event Data Source.
- Overall Pixel data on the ViewContent, AddToCart, and Purchase events that have been fired over the course of a week.
- Retargeting Pixel data fired by you over the course of a week. This will help you confirm that the right Pixel events were fired when visiting certain pages.
Test Events tool
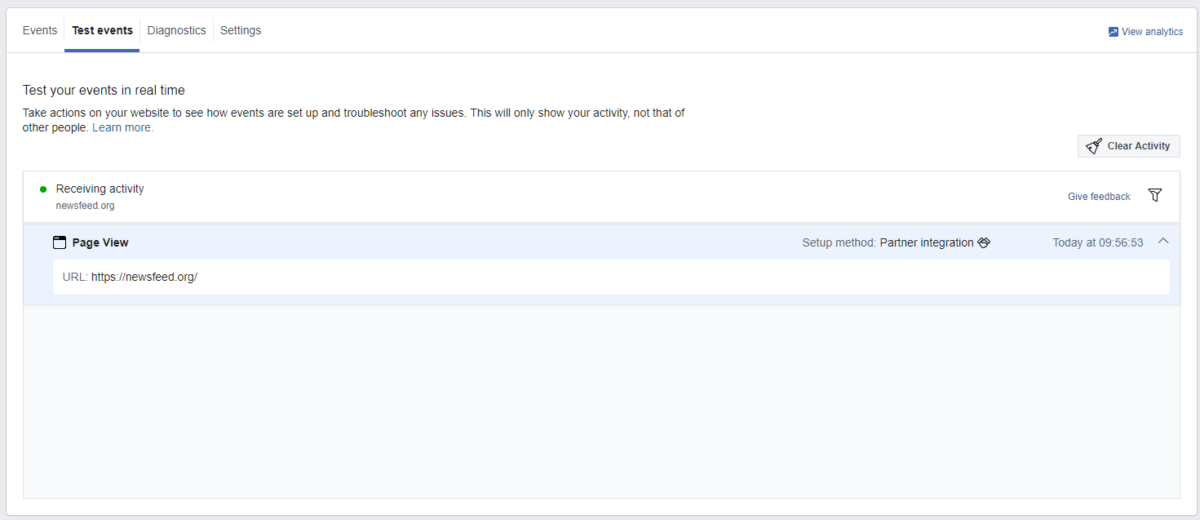
The Test Events tool is Facebook’s new addition in the advertiser’s Pixel Debugging toolbox! You can use this tool to test and troubleshoot your events right in Ads Manager. It is located in the Events Manager section, next to the Events tab.

To use it, you need to open your website on a tab and navigate on the webpage(s) where you have set up the events you want to test/debug. Have in mind that your activity is only recorded while the Test events web page is kept open. Be sure to disable any ad blockers to avoid, or else, the events will not appear.
While navigating, you will see information on the events being fired, the URLs they are being fired on, and the way the event was set up (ex., using a third partner integration such as Google Tag Manager). This information will be available for 24 hours or until you clear it via the “Clear Activity” button.
Events Manager
You can switch to the “Overview” tab, located next to the Test Events tab. All the events that have been fired will be shown here. You can set the date to today to see the events you fired. Keep in mind that it will take about 20 minutes for the events to be displayed here.
Click on the “View Details” option next to the event’s name to see more information
In the pop-up panel, under the graph at the Breakdowns section (C) you can use the drop-down menu (E) to view information on the:
- Tracking Type: The type of event received
- URLs: All URLs where events were detected by this pixel, in order of the number of events received
- Domains: The domains from where the pixel was fired
- Devices: The device type: desktop, Android phone or tablet, iPhone, iPad, and so on the Facebook event was fired on
By switching to the “Activity” tab (D), you will see the activity for your events including information on the event time and parameters sent.
Any warning or errors about the chosen event will be displayed on the Diagnostics tab (A). Here, you will get information on whether an invalid parameter value is being sent or if any required parameters are missing.
Facebook Analytics
Facebook Analytics is another way to verify your pixel setup. Head over to the Facebook Analytics tool and choose the “Event Debugging” option on the left-hand menu. Here you can see the events that were recently recorded on your website or app almost in real time.
By using any of the above tools, you can quickly troubleshoot and confirm that the events are being fired properly, sending the correct set of parameters to Facebook. The next step is to use these events to target your ads to the right audience.


