If you’re in the digital marketing world for quite a while, you might have come across this analytics tool called Google Analytics.
One of the cool features it offers is uploading offline cost data to Google servers which will help you to see all the spends from different sources in a single dashboard.
How cool would it be if you can automate the facebook cost data to google analytics dashboard?
In this article, we’ll be looking at 2 things:
- Export Facebook Data into Google Sheets
- Upload The Same Into Google Analytics.
You can call this a DIY tool & it can be set up in just 5 steps.!!
Let’s have a look at the features:
- Full Quota Usage: Yes… No Limit on the number of rows exported
- Reporting Automation: Schedule Your Reports Hourly/Daily/Weekly/Monthly.
- UTM Export: Export UTM values of the ads.
- GA Upload: Upload Data To Google Analytics & automate it.
- & more…
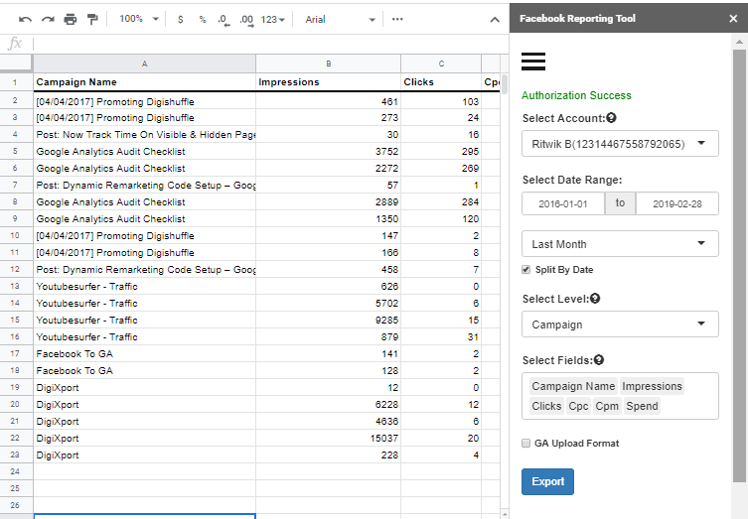
Here’s a glimpse of what it’ll look like:
Excited??.. Now without further ado, let’s get started with the setup.
Steps To Create Facebook Uploading Tool
Step 1: Create a Spreadsheet & Install The Github Code
- Create a Google Spreadsheet
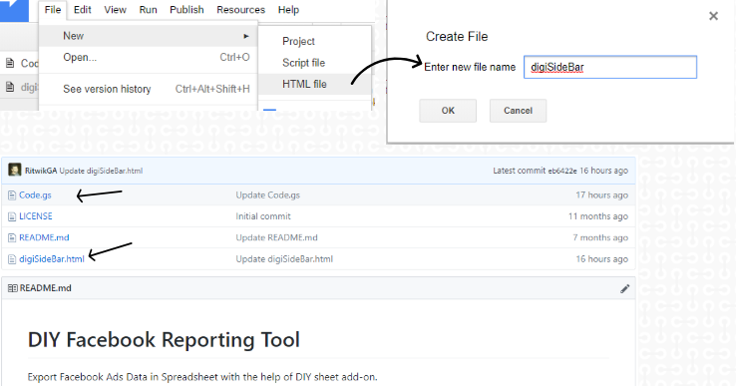
- Go To Tools > Script Editor
- By Default, the ‘Code.gs’ file is already created. You’ll have to create another HTML file (File > New > HTML File) named ‘digiSideBar’.
- Once you create the 2 files ‘code.gs’ & ‘‘digiSideBar.html’, copy the Facebook reporting script from github & paste the code in these 2 files. (as per the names)
- If you want to import data to analytics, you’ll have to turn on the analytics API
- Go To Resources > Advanced Google Services > Turn on Analytics API
- Click on Google API console > Enable the Analytics API.
Step 2: Create a Facebook App.
- Go To Facebook App > Add A New App > Name Your App. (You can name anything)
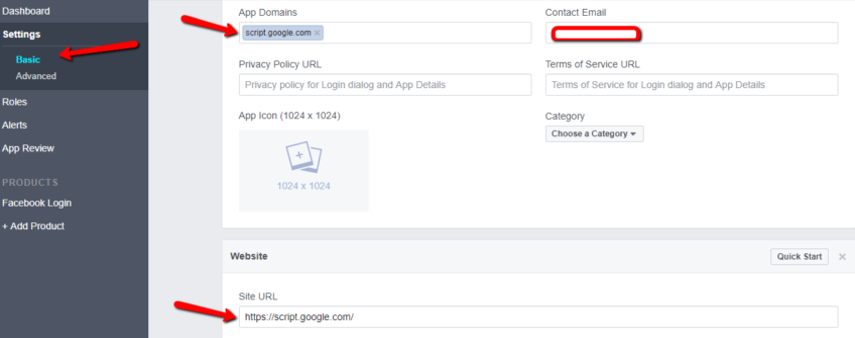
- Go To Facebook App > Settings > Basics
- Include script.google.com in App Domains.
- Add a website & include https://script.google.com/
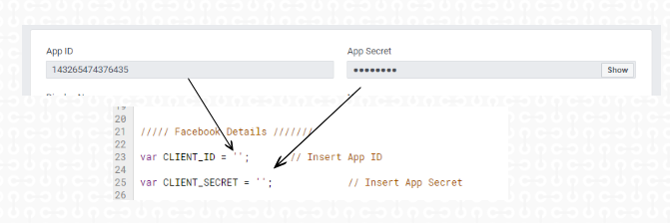
- Copy the App Id & App Secret of your app & paste it as ‘CLIENT_ID’ & ‘CLIENT_SECRET’ in the code.gs.
Step – 3: Add Facebook Login & Redirect URI.
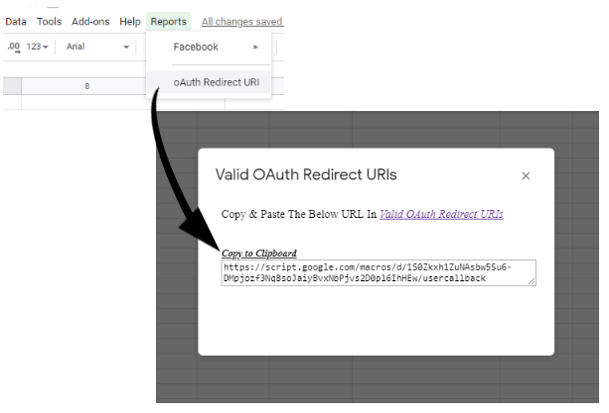
- In the Spreadsheet, click on Reports > OAuth Redirect URI & copy the URL.
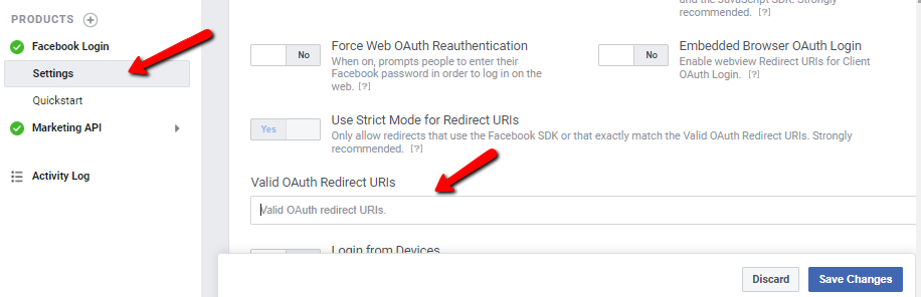
- Go To Facebook App > Click Add Product > Click Facebook Login Setup
- Go To Facebook Login > Settings. Paste the copied URL in the Valid OAuth Redirect URIs & click Save Changes.
And the setup for facebook reporting is done.!!
Step – 4: Fill All The GA Variables. (Only for GA Upload Feature)
- You can find the google analytics account id & property id in the account settings & property settings respectively.
- (Optional) ‘currenyMultiplier‘ : Use this variable to multiply the ‘spend’ fields with a specific value. (You can use it for currency conversions)
- (Optional) ‘isEmail’: Use this to send email after a successful upload. (By setting it to true).
- (Optional) Enter the custom ‘subject’. If blank, it will fall back to the default value. “Facebook Data Upload To GA(ACCOUNTID)“
Step – 5: Create Cost Data Import in GA. (Only for GA Upload Feature)
- Lastly, login to your Google Analytics, Go To Admin > Data Import (In Properties Section) > Create Cost Data Import > Make sure to choose Overwrite data option.
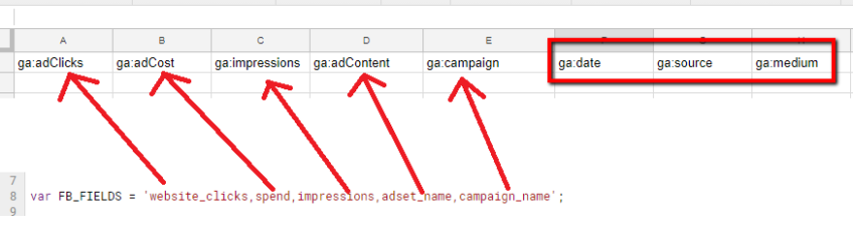
- Click on get schema & copy the headers
- Make sure to paste the headers in the same ordering as “FB_FIELDS” variable & also append ga:date. ga:source & ga:medium columns. (as shown below)
Let’s try running the tool.
Running Your Facebook Data Upload App (Manually)
Now, you can open your spreadsheet & authorize your app to get the reporting interface.
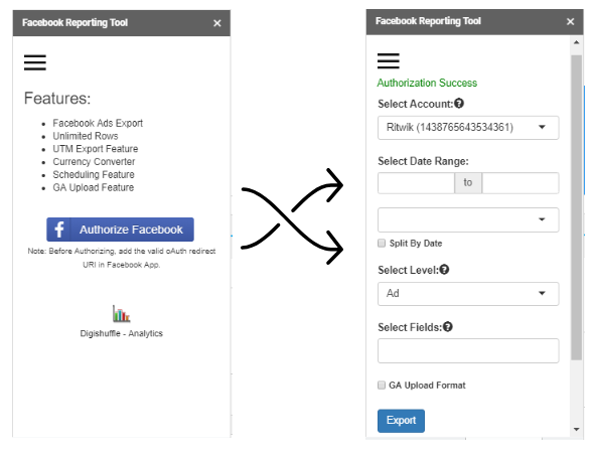
You can now select the following fields & click on Export to get the data in the sheet.
- Facebook Account
- Date Range
- Level
- Facebook Fields
To upload the data into google analytics, make sure to check “GA upload” format before exporting the data & attach the headers (as described in step – 5). Lastly, click on Reports > Facebook > Upload Data To GA. (in the menu)
Now that you have successfully exported the data, let’s look at how you can automate it.
How To Automate Your Data Uploading Process?
To schedule the reports, you’ll need to complete the below 2 steps:
Step – 1: Manually add the variable values in the script.
Let’s have a look at these variables.
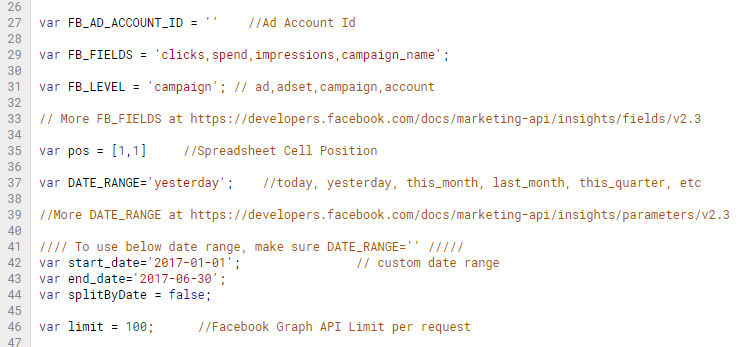
- FB_AD_ACCOUNT_ID: The account id of the facebook ad account.
- FB_LEVEL: The level of export. Values are ad, adset, campaign, account.
- Pos: The cell where you want to export the data
- DATE_RANGE: Pre-defined date values. Values are today, yesterday, this_month, last_month, etc. (It will override start_date & end_date).
- Start_date & End_date: Date Range in YYYY-MM-DD format.
- splitByDate: If enabled, data will be split by date
- Limit: 100 rows per request. You can increase if your data is large.
- isGaUpload: If set to true, exported data will be compatible for GA upload
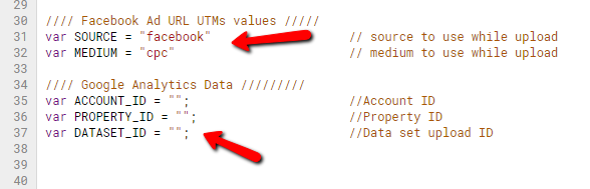
- SOURCE & MEDIUM: source & medium value to upload. (eg: ‘facebook’ & ‘cpc’)
- ACCOUNT_ID PROPERTYID & DATASET_ID: All of which you’ll get from GA admin dashboard.
For the full list of fields, check the facebook marketing api docs.
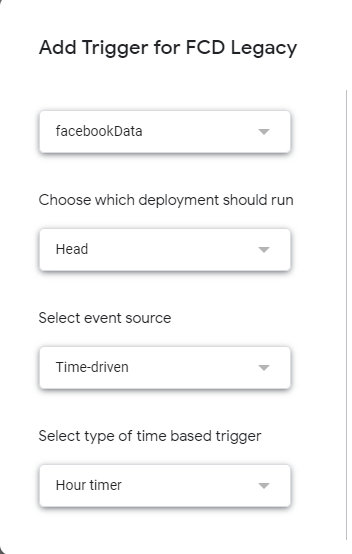
Step – 2: Create a trigger to upload the reports.
- Go to Edit > Current Project’s Trigger
- Create 2 triggers, one for exporting data to sheet & other for uploading it to GA.
- Trigger 1: Select ‘facebookData’ as the function to run & ‘Time-Driven’ as the trigger source.
- Trigger 2: Select ‘uploadDataToGa()’ as the function to run & ‘Time-Driven’ as the trigger source.
- Make sure to choose daily trigger & run these functions consecutively (maybe in the interval of 1 hour)
- Lastly, click save
& that’s it. You have now automated your reports.
Make sure to follow every step correctly so that you won’t receive any errors. Also, some things to keep in mind are:
- Do not publish the app as live.
- Make sure to include OAauth redirect URI in the facebook login’s settings.
If you have any issues do post it in the above GitHub link.