Facebook attribution is a new tool that allows you to measure the impact of your ads across various channels and devices. Thanks to this tool, you’ll get more detailed information about what channels drive the most conversions and what channels and devices are worth investing in. The following article describes how you can set up Facebook Attribution and what data you can get out of it.
What is actually Facebook attribution?
Facebook attribution helps you better understand the impact of your ads across various devices and channels because Facebook can connect data from multiple sources into Facebook Attribution tool. This helps you better allocate your marketing budget and invest in channels that make sense for your business.
You can learn more about the basis of attribution in this article that we have already written for you.
How should I set up Facebook Attribution?
Setting up Facebook Attribution is very simple and takes a few minutes. This functionality should be enabled for most advertisers. If you see an error in Business Manager in the main menu after clicking on Attribution, contact support. Alternatively, the first step is to create a Line of Business, see below (if you already have a Line of Business created for your project or business, ask colleagues to be added to the specific Line of Business).
Firstly, create the so-called Line of Business. Go to the Business Settings section in Business Manager and select “Line of Business” under “Accounts” in the left menu. Click on the blue button “Add”, name your Line of Business and save it. Once created, add items that are related to the specific Line of Business. This includes ad account, mobile app, pixel, custom conversions and also offline events. After adding these items, click on the button “View” in the upper right corner to access the tool.
The last step is to activate your Line of Business. In Attribution tool, select your currency, time zone, and click on the button “Activate Line of Business”. It may take several hours before all the data are uploaded. If you run many campaigns in your ad account, it may take even a whole day.
Data are uploaded – what is the next step?
When your data are uploaded, we recommend going through all of the Facebook Attribution options to help you understand the tool.
Setting up attribution model, attribution window and conversions
In the upper right corner in Attribution you will find three dropdown menus:
- Conversions,
- Date range,
- attribution models and windows.
When you click on the attribution models, you will see the following window:
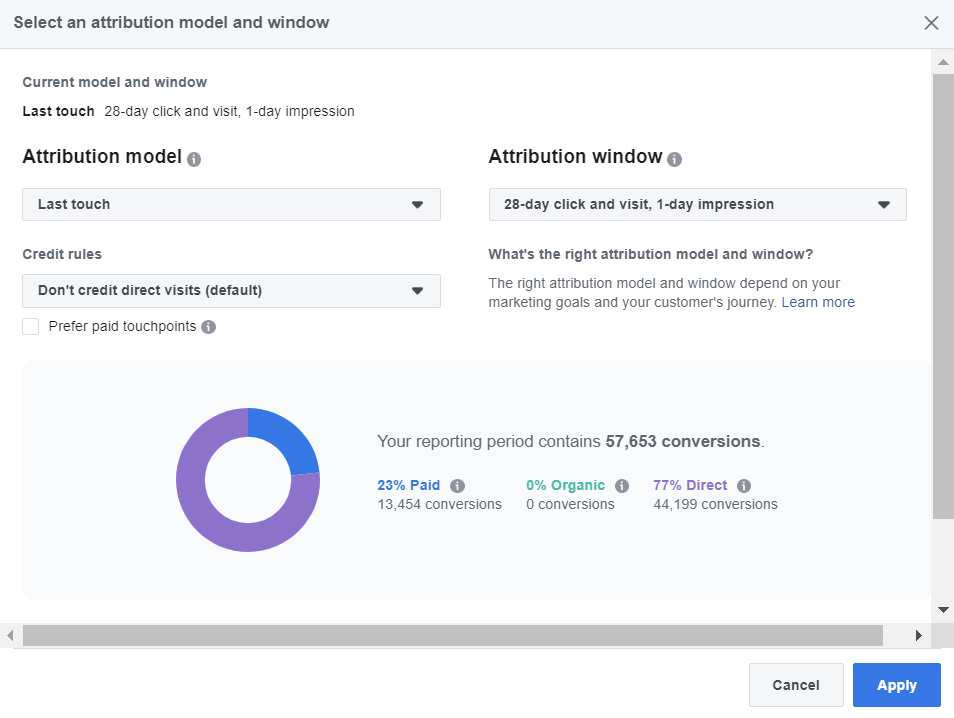
On the left, choose an attribution model you want to use. You can choose from the following options:
- Even credit,
- Last click or visit,
- Last touch,
- Positional 30%,
- Positional 40%,
- Time decay 1-day,
- Time decay 7-day,
- First touch,
- First click or visit.
For more information about how each attribution works click on the icon next to the name of the attribution model.
Do not forget to select an attribution window, which can be up to 90 days after clicking or viewing an ad. Select also a conversion you want to apply to the attribution model as well as choose a date range. Bear in mind that you can only select a date range from the first day you set up attribution. Earlier data are not available.
Connecting other platforms
We recommend connecting other advertising platforms you regularly use to Facebook Attribution. Thanks to this, you can add more data to Attribution so you can see all data in one place. For example, you can connect AdForm, BingAds, Google Ads, or other platforms (manual configuration needed). Learn more about connecting other platforms on Facebook Help.
If you followed all of these steps, you have set up all the basic parameters. In the first tab “Performance”, you can see an overview of paid, organic and direct conversions as well as breakdown by source and channel.
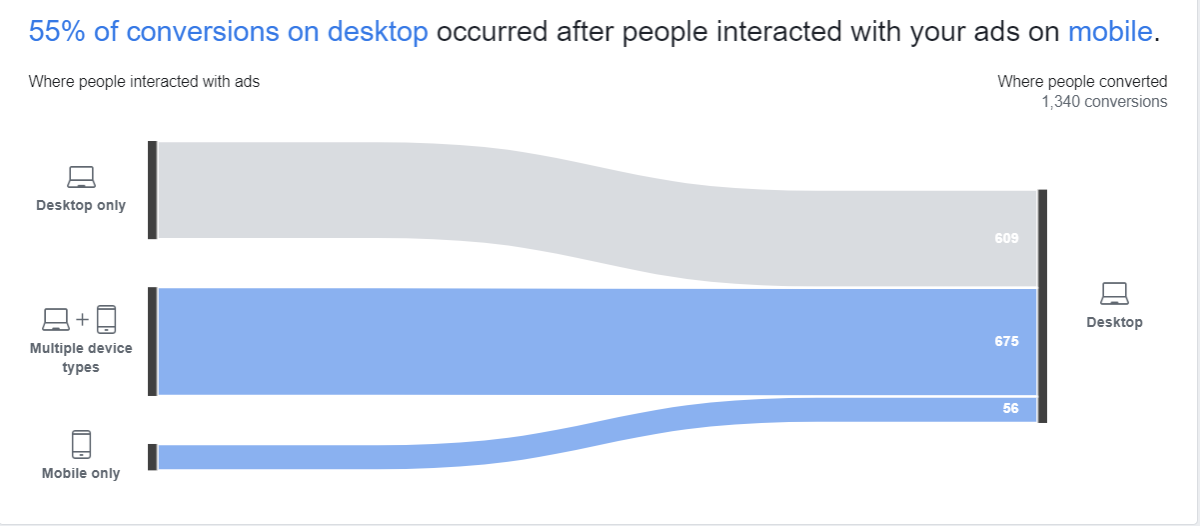
In conversion paths you see reports that show the best conversion paths (you can filter by channel). In the next tab, you can see cross-device paths that show what percentage of people converted on one device after viewing or clicking on your ad on another device.
You can also create and download custom reports in Attribution.
Which data I should focus on?
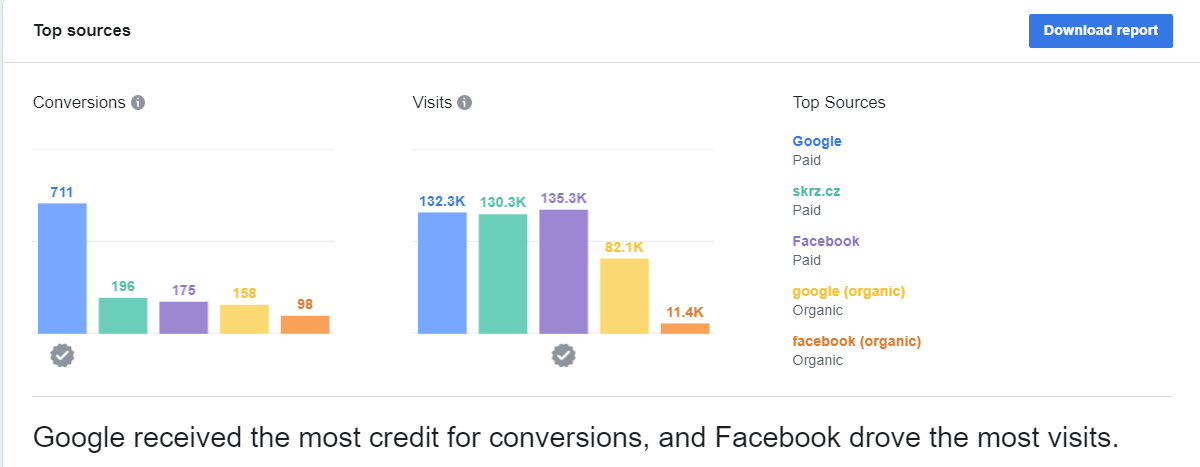
In the performance tab, you can see which sources drive the most conversions (depending on the attribution model and window you select).
The following image shows that paid Google ads have generated the most conversions in a given time period (depending on the attribution model and attribution window selected). You can also break down paid channels and see the difference between Google and Facebook.
Conversion and cross-device paths are also very interesting. In the following image, you can see that 55% of conversions made on computer occurred after people saw or clicked on one of the mobile ads. Based on the information, you can better allocate financial resources to your ads, their placements, as well as think about your customers’ purchase paths and include the information you find into your strategy.
Facebook has not enabled yet all advertising accounts to use a data-driven model for attribution. As soon as this functionality is enabled, you will see a possibility to tick a box in your reports that displays data-driven information.
Have you already tried attribution in your account? We will be happy if you share your experience with us.


