In these modern times we live in, owning a website is a no-brainer. Although many have spoken about the importance of owning a website, in this article I will illustrate that this is not the case as you can take advantage of Facebook’s Shop Section.
If you are a Page owner, Facebook provides you with the ability to create an “eshop” and sell your products right from your Facebook Page. Owning a website isn’t a requirement to fully utilise this feature but I will be going through the pros and cons of having a website in addition to creating a shop on your Facebook Page.
You don’t need to create a website if:
- Your audience is primarily on Facebook.
- You cannot afford the cost.
- You are not sure it is worth the risk.
But, on the other hand you need to create a website if:
- You want to be found online. We live in a digital world, and inevitably potential clients will search for information about you or your products/services online.
- You want to avoid limitations, rules or conditions enforced my third party sites, such as Facebook.
- You want full ownership to the leads you will be attaining and further capitalise your fanbase.
- You want to explore other channels and drive traffic to your store.
Getting started with a Shop Section on your Facebook Page
Go to your Facebook Page and head over to the Settings. Note that you need to be an administrator on the page!
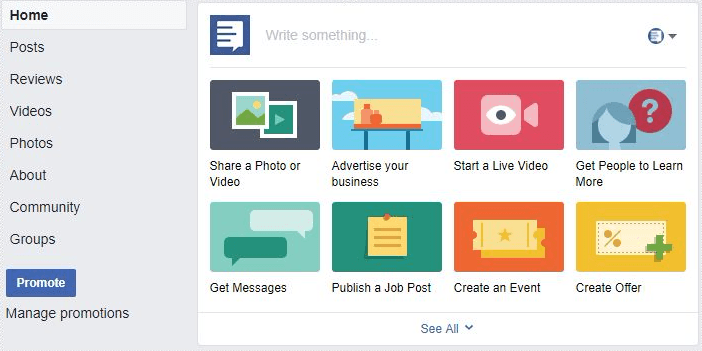
In the case that you cannot locate it, as in the screenshot, you can add it as a tab by going to the Settings of your Page.

Scroll at the end of the page and click on the Add a Tab button. Once you add it, you can re-arrange the tabs to your liking so you can make it appear in the desired position.
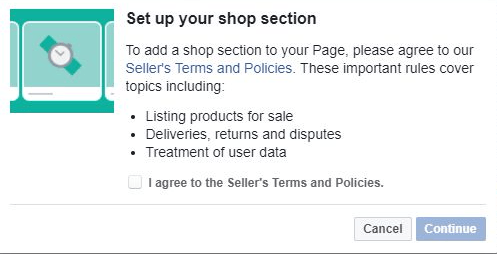
On the left side of your Page choose the newly added Shop tab. Check the “I agree to the Seller’s Terms and Policies.” button – be sure to go over them as there are special Customer Support Policy and Delivery, Return and Dispute Policy that you need to comply with.
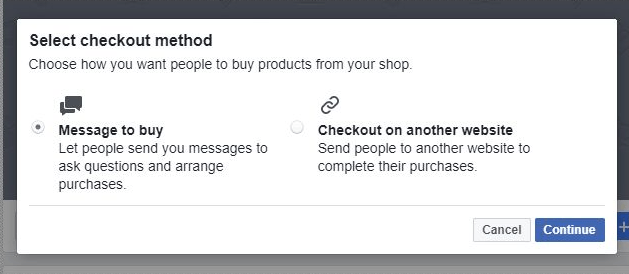
Next, you will be given 2 options on how you want people to buy products from our shop. Choose whichever suits you best. I will be choosing the Message to Buy option as I don’t want to send people to checkout on another website.
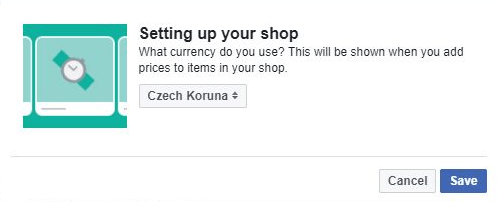
Next, you need to set up the currency. This is not something that you can change easily so be sure to choose wisely.
That’s it! In just under a minute you created your eshop! Now, you need to upload photos, descriptions and prices for your products.
Good to know before uploading product info to your Facebook e-shop
Regarding your images, they shouldn’t contain:
- Text (ex: calls to action, promo codes)
- Offensive content (ex: nudity, explicit language, violence)
- Advertising or promotional material
- Watermarks
- Time-sensitive information (ex: limited time price drops)
Description-wise, they should:
- Provide only information directly related to the product
- Be digestible (ex: make use of short sentences and/or bulleted lists)
- Highlight unique product features
- Be grammatically correct and properly punctuated
In the case that your products have more that one options (different size, colour, flavour, material or any other attribute) you should utilise the variant feature. When doing so you should have the following in mind:
- No more than four variants for a product
- Don’t use abbreviations for variants (ex: write “Large” instead of “L”)
- Use variants instead of listing one product multiple times
Adding products
The process of adding products to your Facebook e-shop is pretty easy and straightforward.
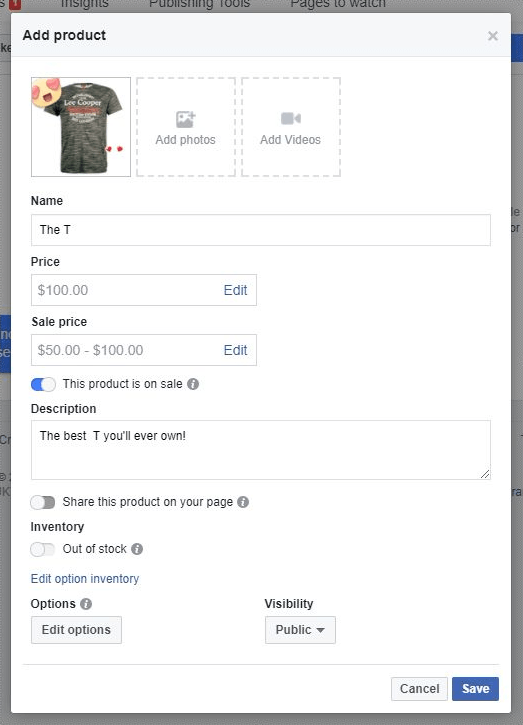
Name: Enter the name of your product or service.
Price: Add the price. In the case that there’s a discount you can let people know by utilising the “This product is on sale” option.
Description: Add a short description.
Share this product on your page: If you are introducing a new product or service this choice can be ideal.
Inventory: Use this to reflect the current status of your product, if applicable.
Edit option inventory: Here you can enter different sizes, colours etc for you products along with their prices and inventory info.
Visibility: Choose the appropriate option based on whether you want a certain option to be visible or not to the public.
Delete product: This option deletes a product from your store.
In the case that you want to make the photo of the product visually appealing, you can choose to edit it by hovering over the desired photo and clicking on the “brush”.
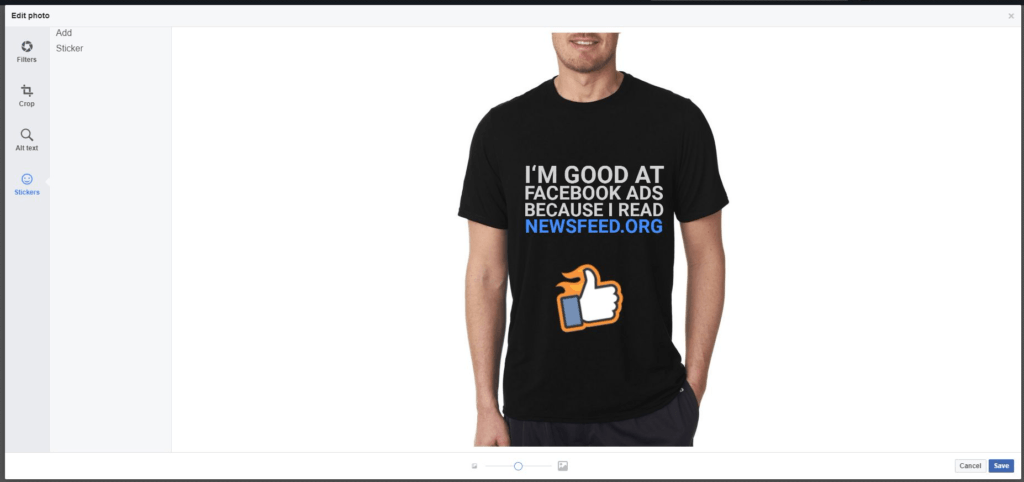
Here you can apply filters, stickers or crop them to make tailor the photo to your liking. You can also apply a an alt text for the visually impaired.
Once you are done, click “Save”.
Each product you add needs to be processed but it won’t take more than few minutes. You will get a notification when it’s done and it’s visible to the public.
Organising your products into collections
Once you are done with uploading your products to your e-shop you can organise them using Collections. Collection are great way to group your products and make it easier for your customers to browse through your products and find what they are looking for. By default, the “Featured Products” collection is created. This can be great for your best selling products. A Collection features no more than 10 products.
In order to create a collection:
- Head over to the Shop section on your Page.
- Click on the gear button.
- Click “Manage Shop”.
- Click on the “Collections” option.
- Click “Add Collection”.
- Enter a name and choose visibility
- Choose the products you want to include in your Collection.
- Click “Save”
Have in mind that you can only have one featured collection.
Testing your Shop
Now that you have uploaded your products and created your first Collection, we can test our Shop. To do so, hover over your Page’s button (Shop Now) and click on test button.
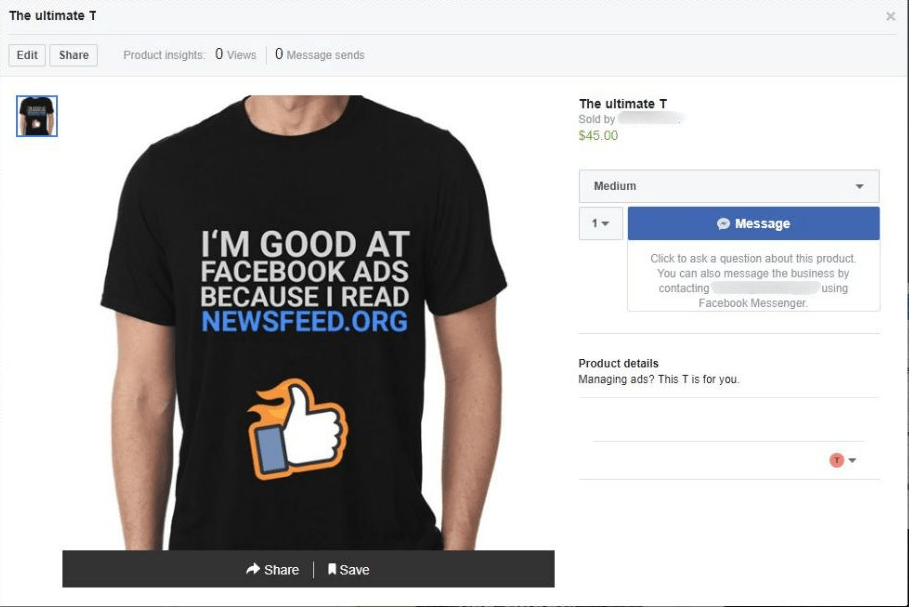
Here you can see a preview of what your potential customers will be seeing. You will be also viewing a summary on how many views or messages were sent for that specific product.
In the case that you’d like to delete your shop, this can be easily done by following the below steps:
- Click the Shop tab
- Click the
 dropdown and select Delete shop
 - Click the Delete Shop button
Have in mind that you will not be asked to confirm your choice so make sure you won’t delete it by accident!
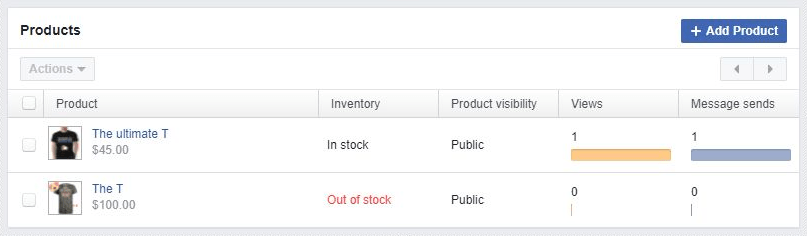
Viewing your e-shop’s performance
If people can send your Page messages about the products in your shop, you can arrange a payment method with your customers, such as a bank transfer or cash on delivery. This applies to all non-US Pages. If you are a US Page and you let people check out from your Facebook Page Stripe or PayPal will transfer the payment to your bank account when you mark the order shipped.
Here, you can also delete or edit products to change the price or status in the inventory.
Sharing your eshop
You can encourage visits from potential customers by sharing the link of your Shop. To do so:
- Click on the shop section of your Facebook Page.
- Click on the gear button.
- Click on the Copy Direct Link.
- Share the link with the people you want to visit the Shop Section on your Page.
Raising awareness and creating engagement for your Shop
When posting a Facebook Post to your Page’s timeline you can choose to tag your products on your photo or video. This helps them identify the displayed products and helps make your post relevant to them and increase engagement.

In order to tag a photo you:
- Open your post and hover over the photo
- Click the “Tag Products” icon
- Choose the product you want to tag and start typing in the product’s name
- Click “Done Tagging” once done.
Collections vs. post tagged with products
Although Collections and posts with tagged products may look very similar there are some key differences that you ought to know.
| Collections | Posts with tagged products |
| Created in Ads Manager | Created in your Facebook Page |
| Available only on Mobile Newsfeed placement | Available on both mobile and desktop devices |
| Is paired with traffic, conversions, catalogue sales or store visit objectives | Not paired with any objective |
Promoting your Shop with Facebook Ads
One of the biggest limitations that Facebook poses on your Shop section is that you cannot promote it with Facebook Ads. This is the reason why they aren’t paired with any Campaign Objective. Boosting tagged posts isn’t an option either as “Facebook doesn’t recommend it since this feature isn’t really meant for advertising”. This is why complementing you existing e-shop as opposed to only having a Shopping Section would be considered the best option.
Although not being able to promote is a big downside, owing a Shop on Facebook can help you boost the ROI of your Facebook page. This is true for Pages with big engaged fan-base.
If you want to further capitalise on the insights from your shop to act upon be sure to check your Shop’s product performance. Check for signals like the products that have received a high number of views or even messages and create single image or carousel ads with them.
Getting the most out of the shop section
- Create a page Username so that it will be easier for your potential customers t o find you.
- Be sure to respond in a timely manner. Furthermore, utilise the messenger possibilities given to Page Owners.
- Share the products on your Page timeline. Sharing a newly added product on your Page timeline can help raise awareness for that product.
- Invite your customers to leave their ratings and/or reviews of your shop to help build your store’s social proof.
- Encourage your fans to subscribe to your shop so they get notifications whenever you add new products.